Multiples calculator

Laura Guijorro Ramos

The “Multiples Calculator” activity combines mathematical concepts with programming using circuit boards, electrical circuits, and their connections. This activity is designed for students aged 10 and above, specifically those in the third cycle of Primary Education, starting from 5th grade. It is planned to be carried out over three 1-hour sessions. The activity can be done in a regular classroom, provided there are tablets or laptops available, or in a computer lab. 

In the first session, students will work on mathematical concepts such as prime and composite numbers, multiples, and divisors. For this, Lego blocks or similar interlocking manipulatives will be needed. During the second and third sessions, students will use educational boards compatible with Makey Makey to build circuits, observe how connections work, and program the system so that a character announces the color of the piece being touched. Later, the program will be expanded to calculate multiples of 2, 3, and 5. 

Dowload Educational Programme


Would you like to teach your students hands-on concepts about prime and composite numbers, multiples, and divisors? What if we connect these ideas with programming an educational board using Makey Makey connections and create a calculator that computes multiples? Then this is the perfect activity for you. In this guided, step-by-step project, you’ll find everything you need to implement it in your classroom. 

I propose several playful activities through which students will explore and understand key mathematical concepts. A prime number is represented by a single Lego piece, while a composite number is formed by combining multiple pieces whose values multiply together. Multiples are built by creating a number with Lego pieces and then adding more pieces that represent the multiplication process. Divisors are the values or pieces into which a number can be evenly separated. 

After exploring these concepts hands-on using Lego blocks, students will move on to creating a multiples calculator using Echidna boards connected via Makey Makey. In the second session, students will learn how to work with the board and how to make the necessary connections. Finally, in the third session, they will apply their knowledge and use programming variables to develop their own multiples calculator. 

This activity is designed for students from the third cycle of Primary Education, starting at age 10 or from 5th grade. It can be carried out in the regular classroom if laptops are available; otherwise, it may need to be conducted in a computer lab.

The proposal includes three activities, each corresponding to a separate one-hour session:

  • Session 1: Prime and composite numbers, multiples, and divisors using Lego.
  • Session 2: Introduction to an Echidna board and Makey Makey connections.
  • Session 3: Multiples calculator.


Session 1: Prime and composite numbers, multiples, and divisors using Lego

In this first session, students will explore mathematical concepts such as prime and composite numbers, multiples, and divisors through hands-on activities with Lego blocks. In sessions two and three, they will use Makey Makey connections and program an Echidna board to develop the calculator.

To carry out Session 1, the following materials are required:

  • Tangible materials: LEGO blocks and dice (at least one per group).
  • Electronic device: Tablets, one per student, to complete a final Kahoot activity. However, this final part can also be done offline if needed.

The activities in this session will be guided, with concept explanations followed by various “Lego games” to reinforce understanding. A total of three activities will be conducted during this session.

Activity 1: Building Numbers up to 20 with Lego

Students are shown an image containing several numbers and asked if they notice any patterns or connections between them. If they do, they are encouraged to explain what they see and why.

The concepts of prime and composite numbers are introduced. A prime number is represented by a single Lego piece, while a composite number is represented using multiple pieces.

  • In this activity, each prime number is associated with a specific color: blue (2), yellow (3), pink (5), white (7), red (11, 13, 17, and 19). Figure 1 shows the color code used in this session.

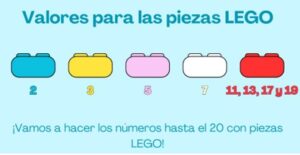
Figure 1. Multiples. Session 1. Image showing the color code.

  • The teacher demonstrates how to build the numbers up to 7 using Lego pieces.
  • Then, students are asked to construct the numbers from 2 to 20 using Lego blocks, applying the color code and concepts they’ve learned.

An example of the outcome from this activity is shown in Figure 2.


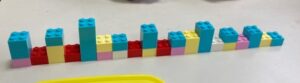
Figure 2.Multiples. Session 1. Example of numbers up to 20.


Activity 2: Creating Multiples with Lego Pieces

  • Students are introduced to the idea that multiples are built by starting with a Lego piece representing a number and then adding (multiplying) pieces to form its multiples.
  • Taking turns, students roll a die and build the first five multiples of the number they rolled. Figure 3 shows examples of the multiples of 2, 3, and 4 from left to right.
  • As a variation, students can roll the die twice, then either add or multiply the two numbers, and create the first three multiples of the resulting number.

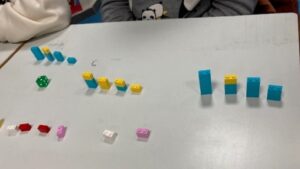
Figure 3.Multiples. Session 1. Multiples activity with Lego.


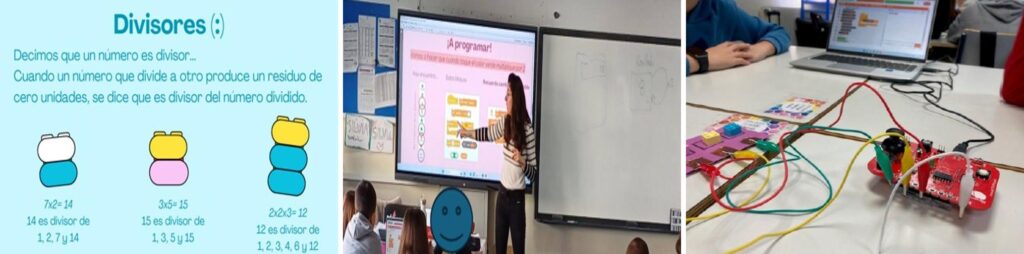
Activity 3: Divisors Using Lego Pieces

Students are taught that divisors are numbers that divide another number evenly, with no remainder. Using Lego pieces, they can visually explore how a number is made up of its divisors. A composite number, in this case, can be represented by the combination of Lego blocks used to build it.

For example, the number 12 can be built using two blue pieces (value 2 each) and one yellow piece (value 3). This shows that 12 is made up of the numbers 2 and 3, but also the products of these values:

2 × 2 = 4

2 × 3 = 6

2 × 2 × 3 = 12

Therefore, the divisors of 12 are: 2, 3, 4, 6, and 12.


Figure 4 illustrates how this concept is explained during the presentation.

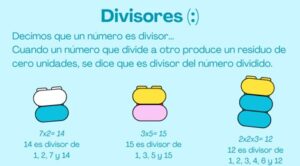
Figure 4.Multiples. Session 1. Slide explaining the concept of divisors


Students are then asked to access the Kahoot quiz on divisors via this link: https://bit.ly/4iVXI0S  and complete the test.

All these activities were designed after watching the Matesenelinst video, available at https://bit.ly/4iB8AkW.

Session 2: Introduction to an Echidna Board and Makey Makey Connections

In the second session, students are introduced to programming with boards using Makey Makey connections. The main objectives of this activity are:

  • To become familiar with technology-related terms such as microcontroller, input elements, and output elements of a board.
  • To learn about essential programming blocks, including looks, events, control, and board-specific blocks.
  • To create electrical circuits using Makey Makey connections.

To begin programming boards using a block-based language such as Scratch.

Materials required for session 2:

  • Devices:
    • Echidna Shield boards connected to an Arduino Uno or Echidna Black boards.
    • Four crocodile-style alligator clip cables per board.
    • Computers with Echidna ML software installed. This desktop application includes a modified version of Scratch with additional blocks to program Echidna boards and also supports AI modules through Learning ML.
  • Tangible materials: Aluminum foil or other conductive material, paper clips, cardboard with aluminum foil, and Lego blocks.

Figure 5 shows an image of the materials used.

The proposed activities will be delivered in two formats depending on the students’ prior knowledge:

  • Guided exercises for those new to electronics.
  • Challenge-based tasks for students with existing experience.

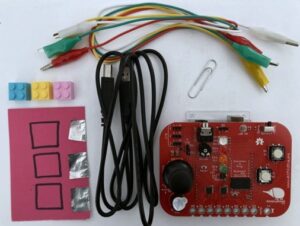
Figure 5. Multiples. Session 2. Examples of devices and materials used.

During the second session, students will complete the following three activities.


Activity 1: Understanding What a Board Is (10 minutes)

A brief presentation introduces the components of the board, using a visual comparison between the board and the human body. The board acts as the brain, some components as senses that receive information, and others as limbs that execute commands.

For example, if I touch something hot, my brain detects it and sends the command to withdraw my hand. Similarly, the board collects input, processes it (like a brain), and sends instructions to other components to perform actions.

Students will then classify various elements as either input or output devices.

This presentation is based on the work of Jorge Lobo, José Pujol, and Xabier Rosas, available at the Echidna website: https://echidna.es/didactica/primaria/actividad-steam-01/.


Activity 2: Connecting the Circuit (10 minutes)

The concept of a circuit is briefly explained, followed by instructions on connecting the board with 3 sensors and a ground connection.

Figure 6 shows how to connect the devices properly. Clips must grip the connector firmly rather than being inserted through holes, as incorrect connections prevent circuit completion.

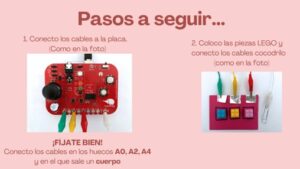
Figure 6. Multiples. Session 2. Connecting a circuit.


Activity 3: Programming a Makey Makey Connection Circuit (20 minutes)

After assembling the circuit, students program it so that a cat character says different words depending on which sensor is touched. This reinforces the idea of the board as the “brain” that responds when the circuit is closed.

For example, touching the foil on the blue Lego piece triggers the character to say “blue.” The same applies to the other two colors.

Figure 7 shows an example of classroom activity and solution. For beginners, the necessary programming blocks are introduced and explained. Students arrange the blocks correctly to program the blue color response, then test their work.

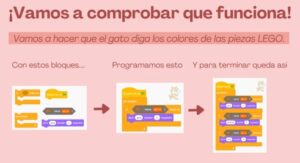
Figure 7. Multiples. Activity 2. The cat says the colors of the Lego pieces.


Finally, they duplicate the program for the yellow and pink colors and verify functionality. Figure 8 presents an example of a programmed circuit in this activity, showing the developed program, the character responding with the correct color, and the board connected to a computer. It also illustrates how students must touch the clip and conductive material to close the circuit and trigger the response.

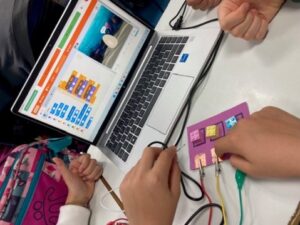
Figure 8.Multiples. Session 2. Example of programming in the classroom.

Session 3: Multiples Calculator.

In the third session, students will learn how to create a multiples calculator using the knowledge gained in the previous two sessions. The concept of a variable will be introduced to accumulate the results of the calculations performed with the calculator. A variable is a data element that changes but does not modify the program itself. In this case, the variable will be numeric and represent the result of multiplying the base number. It is essential to initialize the variable with the value 1 because if it starts at 0 (the default), the program will not work—any number multiplied by 0 is 0. Starting at 1 ensures that any number multiplied by 1 remains that number.

For example, the variable begins as 1, and each time the board detects a circuit connection, it multiplies the variable by the associated value. If the blue piece is touched, the variable (1) is multiplied by 2, becoming 2. Touching the blue piece again multiplies the variable by 2, changing its value to 4. Touching the pink piece multiplies the variable by 5, changing its value to 20 (5 × 4), and so on. To start over, clicking the green flag resets the variable to 1 as the program restarts.

The materials used are the same as in session two.

To guide the creation of the multiples calculator, the following steps are proposed:

  1. Review concepts from previous sessions:
  • What is a prime number? What is a multiple?
  • Input and output elements of a board.
  • What is a microcontroller?
  • Makey Makey connections and what is a circuit.
  1. Explanation of the variable concept in programming: A variable is a place to store information that can change during program execution. We use a numeric variable here. Explain why the default value must be changed from 0 to 1 in Scratch, since 1 is the multiplicative identity (0 × any number = 0, but 1 × any number = that number).
  2. Presentation of the session challenge:
  • Each time a Lego piece is touched, it multiplies by its associated value.
  • The new value updates and replaces the previous result (like a calculator’s memory).
  • The ability to reset the value to 1 when needed.
  1. Programming the calculator:
  • Allow students time to think about how to solve the problem and which blocks to use. For beginners, provide guidance on necessary blocks.
  • Display the blocks in a scrambled order (as shown in Figure 9) and ask students to arrange them correctly to create the program.


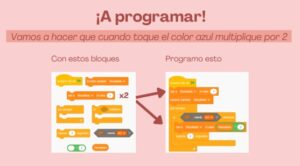
Figure 9. Multiples. Session 3. Unordered blocks and correct programming

  • After some time, provide the correct solution so they can check for errors or confirm accuracy. Start with programming number 2. Once this is done, students can duplicate and adjust the program to work for numbers 3 and 5 by changing the numeric values and Makey Makey connections from A0 to A2 and A4.
  • Ask students to test that their programs work correctly.
  • Encourage students to test very large numbers to observe limitations when storing large values in numeric variables.

Figure 10 shows an example of the final result, where students have successfully programmed the multiples calculator using boards and a block-based programming tool.

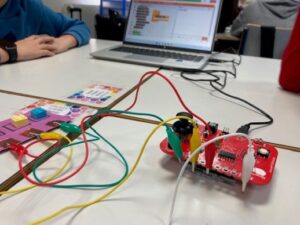
Figure 10. Multiples. Session 3. Example of the multiples calculator

The activity was carried out at CEIP Pedro Duque (Madrid) with students from the 3rd cycle of Primary Education (5th and 6th grade). Approximately 150 students participated in total (3 classes per grade). The methodology used was game-based learning in the first session and a mix of traditional teaching and “learning by doing” methodologies in the second and third sessions.

Figure 11 shows on the left how the explanation of the activity with Lego blocks was carried out, and on the right, it shows students working with the blocks and using dice to create the first five multiples of the number rolled.

In Figure 12, the board with the necessary connections to run the program is shown. On the computer screen, the program for the calculator of the number 2 is visible on the left side, and on the right side, the character can be seen with the variable displaying the number 1 above it on the left.

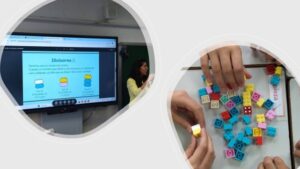
Figure 11. Session 1 implementation. Prime and composite numbers, multiples, and divisors with Lego

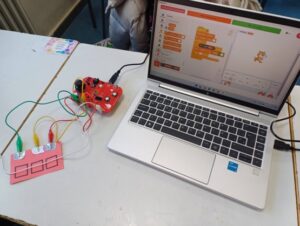
Figure 12. Session 2 implementation: Presentation of Echidna and its connections


Figure 13 shows the explanation of the blocks needed to create one of the values and the menu where each block can be found. Additionally, the interactive whiteboard displays the explanation of variables.

Figure 13. Session 3 implementation: Multiples calculator. Explanation of variables


In Figure 14, two examples of programs created by different students are shown, with them verifying that the calculators work properly.

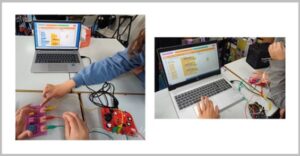
Figure 14. Session 3 implementation: Multiples calculator. Projects created

After completing the activity, we observed that students are motivated to engage with and understand all the content, even if they had no prior experience with technological topics such as board programming or circuit connections. However, caution is needed, as students sometimes confuse basic concepts, for example, classifying screens as input devices instead of output devices, or incorrectly connecting crocodile clips by inserting them into holes instead of pinching the metal ring.

Regarding the math session, students enjoy it and improve their understanding of concepts like prime and composite numbers, multiples, and divisors. Working cooperatively, they help and correct each other when mistakes are noticed. In the Kahoot activity, however, care is needed because some students were more focused on being the first to answer rather than answering correctly or taking time to understand the questions. Despite the questions being simple and supported by images with hints, there were quite a few careless mistakes made in the rush to be first.

When setting up the boards, it’s important to note that computers do not come with the necessary software installed by default, nor do the boards get recognized automatically the first time they are plugged in. Therefore, time must be allocated beforehand to install drivers and the programming software.

Another point to keep in mind is that the boards have a switch to select between sensor mode or Makey Makey mode. It must be set to Makey Makey, not sensors. Students sometimes change this setting while using the boards, which can cause errors when running the program.

I conclude by sharing my opinion after observing that this activity is one in which students both enjoy themselves and learn mathematics in a playful and hands-on way. Through challenges, they begin to program and understand concepts related to technology, such as electrical circuits, connections, and programming educational boards.

Finally, I encourage teachers to implement activities like this in the classroom, as they also present challenges for us as educators, sometimes pushing us out of our comfort zones and helping us grow in our own learning.


Funding

The materials for the execution of this activity have been funded by the Erasmus+ CoTEDI project, which is funded by the European Union under Key Action 2023-1-NL01-KA220-SCH-000152037 – OID E10207981.


Acknowledgements

I am grateful to my teachers and tutors Estefanía and María for providing me with so many tools to carry out this activity, for trusting me to do it, and for helping me throughout the process. I also thank the school, the students, and the teachers for allowing me to enter their classrooms and test this project that we have created with so much enthusiasm.


References

Chafloque Huamán, J. P. (2018). Implementación de un software educativo basado en el modelo learning by doing para mejorar el rendimiento académico de la asignatura de matemática en alumnos de tercer grado de educación primaria de la IE 10132 Jesús Divino Maestro.

Guijorro-Ramos, L. (2025a) ¿Están los números conectados? Disponible en: https://bit.ly/3FlxAhf.   

Guijorro-Ramos, L. (2025b) Aprendo qué es y cómo programar una placa. Disponible en: https://bit.ly/3RF0CeA.  

Herreros, D., & Sanz, M. T. (2020). Estadística en educación primaria a través del aprendizaje basado en juegos. Disponible en: http://hdl.handle.net/10396/20259.  

Lobo, J., Pujol, J. & Rosas, X. (2021). Primaria – Echidna Educación. Echidna Educación. https://echidna.es/didactica/primaria/  

Matesenelinsti (2011) Múltiplos y divisores con piezas de Lego. Disponible en: https://www.youtube.com/watch?v=owCgyHbCF1c.    

EP title

Multiples calculator

Author

Laura Guijorro Ramos

Name of Educational Center

CEIP Pedro Duque

Status

Done

Start Date

27/01/2025

End Date

04/02/2025

Target groups

Age range of students

10-12

Grade level

Primary school

Number of students involved

150 students – 6 classes: 3 from fifth grade (10-11 years old) and 3 from sixth grade (11-12 years old).

Educational context

Session 1: In the regular classroom or in the computer lab if you want to do the last activity on divisors using Kahoot.

Sessions 2 and 3: Regular classroom if laptops are available, or computer lab to use the computers.

Diversity

The activities were designed following the guidelines and considerations of Universal Design for Learning, considering all possible diversities that may be found in the classroom, whether physical, cognitive, cultural, etc.

Required resources

WiFi connection is required

Yes

Devices

Session 1: Tablets for Kahoot.

Sessions 2 and 3: Computers with Echidna ML installed, boards (Echidna Shield with Arduino Uno or Echidna Black), and 4 crocodile clip cables per board.

Tangible materials

Session 1: LEGO® pieces separated by colors and dice or any manipulative, connectable material with enough colors to carry out the activity.

Sessions 2 and 3: Aluminum foil or conductive material, paper clips, cardboard with aluminum foil, and LEGO blocks.

Activity description

Activity Description

Session 1: Prime and composite numbers, multiples, and divisors with Lego.

The objectives of this first session are as follows:

§  Understand manipulatively the connection between prime and composite numbers.

§  Observe how multiples of a number are created by multiplying prime and composite numbers.

§  Manipulate the divisors of a number by “separating” the prime and composite numbers.

Session 2: Introduction to an Echidna board and Makey Makey connections.

In this session, students will learn about the main elements of a board, what a Makey Makey connection is, what an electronic circuit is, and how to program a board with Makey Makey connection using block programming. The objectives are:

§  Learn about input elements, output elements, and microcontroller.

§  Understand Makey Makey connections and circuits.

§  Program with Scratch blocks.

Session 3: Multiples calculator.

In this activity, students will program a calculator for prime numbers (2, 3, and 5) using a board with Makey Makey connection. The goals of this session are:

§  Review the knowledge acquired about input elements, output elements, and microcontroller.

§  Reinforce the knowledge acquired about Makey Makey connections and circuits.

§  Program using variables.

§  Program with Scratch blocks.

Total time needed

3 hours (1 hour per session) for each class where the complete activity is carried out.

Subject(s)

Mathematics, Natural Sciences, and Technology and Robotics

Specific topic addressed

§  Mathematics: Numbers and operations.

§  Natural Sciences: Technology and Digitization.

§  Technology and Robotics: Computational Thinking and Electricity.

Plugged / Unplugged

Unplugged and plugged-in (depending on the session).

Type of Activity

Lego based activities and programming boards with Scratch-based programming environment.

The three sessions developed in this activity are implemented in a playful way. Some content is explained, and students are asked to manipulate that content by experimenting and creating their own solutions.

In the second session, a guided programming activity is proposed where students will learn about fundamental elements of a board, as well as specific programming to solve a problem: when I touch a piece, the cat says the color.

In the third session, another guided activity is proposed to program a Makey Makey circuit where each time a piece is touched, it multiplies by the associated value (2, 3, and 5). In this way, we calculate multiples of prime numbers.

Individual / Collaborative.

In the first session, the first two parts can be done in groups (4-5 students) or in pairs. The last part, the Kahoot, is done individually.

In the second and third sessions, the activity can be done in pairs, and if there are not enough boards, groups of 3-5 people can be formed.

Level of creativity

Low

Level of technology

Low

Computational skills worked and how they are developed

Session 1: Prime and Composite Numbers, Multiples and Divisors with Lego.

In the first session, the following computational thinking skills are worked on:

§  Logic: since they must analyse the challenge presented to them.

§  Abstraction: they need to eliminate unnecessary details and focus on those that are necessary.

§  Evaluation: they must verify that the combination of the chosen blocks represents the correct number.

§  Error Detection: they should identify mistakes that a classmate might make when multiplying incorrectly.

Session 2: Introduction to an Echidna Board and Makey Makey Connections.

In this session, the following computational thinking skills are worked on:

§  Logic: since they must analyse the challenge presented to them.

§  Abstraction: they need to eliminate unnecessary details and focus on those that are necessary.

§  Evaluation: they must check that the prototype works.

§  Error Detection: they should detect errors that cause the program to fail.

Session 3: Multiples Calculator.

In this third session, the following skills are worked on:

§  Logic: since they must analyse the challenge presented to them.

§  Patterns: using the knowledge from the previous activity, they can detect patterns and similarities to apply them in the program development.

§  Abstraction: they need to eliminate unnecessary details and focus on those that are necessary.

§  Evaluation: they must check that the prototype works.

§  Error Detection: they should detect errors that cause the program to fail.

Activity protocol and guidelines

Activity Protocol and Guidelines

Session 1: Prime and composite numbers, multiples, and divisors with Lego.

Session 1, Activity 1. Create numbers up to 20 with Lego

§  An image with numbers is shown (see Figure 1), and students are asked if they see a connection between those numbers, and if so, to say which and why.

§  It is explained what a prime number and a composite number are. The concept of prime is associated with a single piece, and composite with more than one piece.

§  They are shown how to make numbers up to 7.

§  They are asked to create numbers from 2 to 20 using Lego pieces.

Session 1, Activity 2. Creating multiples with Lego pieces

§  The dynamic is explained: multiples are created by taking the number piece and adding (multiplying) the multiple (see Figure 2).

§  Students take turns rolling the die and create the first 5 multiples of the number they rolled.

§  A variant is that they either add or multiply the given number and create the first 3 multiples of that number.

Session 1, Activity 3. Divisors with Lego pieces

§  It is explained that divisors are numbers by which you can divide another number with a remainder of 0.

§  With Lego pieces, we can verify that these numbers are the ones that compose that number. Visually, we can check that a composite number is formed by the numbers (pieces) that make it up (see Figure 4). For example: 12 can be formed by 2 blue pieces (value 2 each) and one yellow piece (value 3). So, the numbers that compose 12 are the values of each piece: 2 and 3, but also their multiplication: 2×2 = 4; 2×3 = 6; and 2×2×3 = 12, so the divisors of 12 are: 2, 3, 4, 6, and 12.

§  Students are asked to join the Kahoot (https://bit.ly/4iVXI0S) and take the divisors quiz.

Session 2: Introduction to an Echidna board and Makey Makey connections.

Session 2, Activity 1. Understanding what a board is (10 minutes)

§  Brief presentation about the elements of the board. Visual image and comparison of the board with the human body. The board is the brain, and some components are the senses that receive information, and others execute actions like limbs. For example, if I touch something hot, my brain detects it and sends the order to move my hand away.

§  On the board, some elements collect information, the program (brain) executes, and sends an order to another element to perform a specific action.

Session 2, Activity 2. Connecting the circuit (10 minutes)

Brief explanation of what a circuit is and then how to connect the board with 3 sensors and a ground (see Figure 6).

Session 2, Activity 3. Programming a Makey Makey circuit (20 minutes)

 Once the circuit is explained and assembled, students will create a program where a cat says different things depending on the sensor connected. This helps to reinforce the idea that the board is like the “brain,” and what we “touch” closes the circuit, triggering a response — the colour of the piece touched. For example, if we touch the foil on the blue piece, the cat or chosen character says “blue”; if yellow piece, it says “yellow”; if pink piece, it says “pink” (see Figure 7).

Session 3: Multiples calculator.

The following steps are proposed as a guide for this session:

1.       Review concepts from previous sessions:

o   What is a prime number? What is a multiple?

o   Input and output elements of a board.

o   What a microcontroller is.

o   Makey Makey connections and what a circuit is.

2.       Explain the concept of variables in programming: Explain that a variable is a place to store information that can be modified during program execution. In this case, a numeric variable will be used. Also explain why it is necessary to change the default variable value from 0 to 1 in Scratch (due to the neutral element of multiplication). Since we multiply by a number, we must start at 1 because 0 times any number is 0, and 1 time any number is the number itself.

3.       Present the challenge for the session:

o   We want each Lego piece touched to multiply by its associated value.

o   We want that value to update the previous one and store it (like the calculator’s result display).

o   We want to be able to reset to 1 whenever needed to start over.

4.       Programming the calculator (see Figure 10):

o   Let students think about how to solve the problem or what blocks are needed. If the group is just starting, help by indicating which blocks will be needed.

o   Show the blocks unordered on screen and ask them to create the program step-by-step. First program the number 2 value. Then explain how to duplicate this to create programs for values 3 and 5.

o   After some time, provide the completed program so they can check for errors or verify it’s correct, and then continue programming for numbers 3 and 5 by duplicating necessary blocks. Change values 2 to 3 and 5, and connections from A0 to A2 and A4.

o   Once programmed, ask them to test if it works.

o   Allow them to create endless numbers or go to infinity to observe issues with storing large values when using numeric variables.

Teacher Training

Session 1: Prime and composite numbers, multiples, and divisors with Lego.

The teacher should watch the video by Matesenelinsti (2011) to understand the explanation of the content using Lego pieces and to be clear about the game routine. The presentation followed to develop this activity is available at: https://bit.ly/3RF0CeA (Guijorro-Ramos, 2025b).

Session 2: Introduction to an Echidna board and Makey Makey connections, and Session 3: Multiples calculator.

The teacher should be familiar with block programming in Scratch, including elements such as variables and conditionals. They must know how to use these blocks fluently to program correctly. Additionally, they should have basic knowledge of what a board is and its components: inputs, outputs, or microcontroller, and how these detect, execute the program, or act according to the programmed command. Finally, they should understand what conductive materials are, how to connect circuits (from the board to the cardboard), and what materials are used for the activity. This training can take 2–3 hours, depending on each user’s prior knowledge. More information about boards and connectors can be found on the Echidna board website: https://echidna.es/didactica/primaria/ (Lobo, Pujol & Rosas, 2021).

The presentation followed to develop this activity is available at: https://bit.ly/3QYkGs6 (Guijorro-Ramos, 2025b). The multiples calculator is available at: https://bit.ly/4je3v1G.

Inclusion

Adaptation for Special Needs

No adaptations were made during implementation since, although there were students with special educational needs, they did not require any adaptations. However, when working with the Lego pieces, we had to ensure that the colours had sufficient contrast so that some students could distinguish them (colour blindness). The Echidna ML program also includes an option to adjust block contrast, but in this case, it was not necessary.

Learning adaptations

No adaptations were made during implementation. However, we can consider spacing out and slowing down the presentation of information, especially regarding technology-related concepts, for students who find it difficult to assimilate new concepts.

Additional details

The activities proposed in the first session could be varied or expanded:

§  In Activity 1, students could be asked to create up to 25 or 30.

§  In Activity 2, it could be extended by making two dice rolls and then adding or multiplying the resulting numbers to find the multiples of those numbers.

§  In Activity 3, cards could be created so that students build those numbers with Lego pieces and identify their divisors.

In the second session, activities could be varied or expanded by changing the background and character or by adding voice and sound to the text displayed on the screen.

In the third session, the activity could be adapted if the boards are not available, but computers are, by creating the calculator in Scratch without connection to a board. It is also possible to allow customization of the characters used during programming.